Modules · For everyone on the floor
Production and process control
How the work moves
Production record- 1Plan the job
- 2Run controlled operations
- 3Record inspection
- 4Mark ready for release
Open: More > Production & Process Control. Typical preparers: Quality Manager, Department Manager, and QA Technician. Release authority: Quality Manager or administrator.
Establish controlled conditions
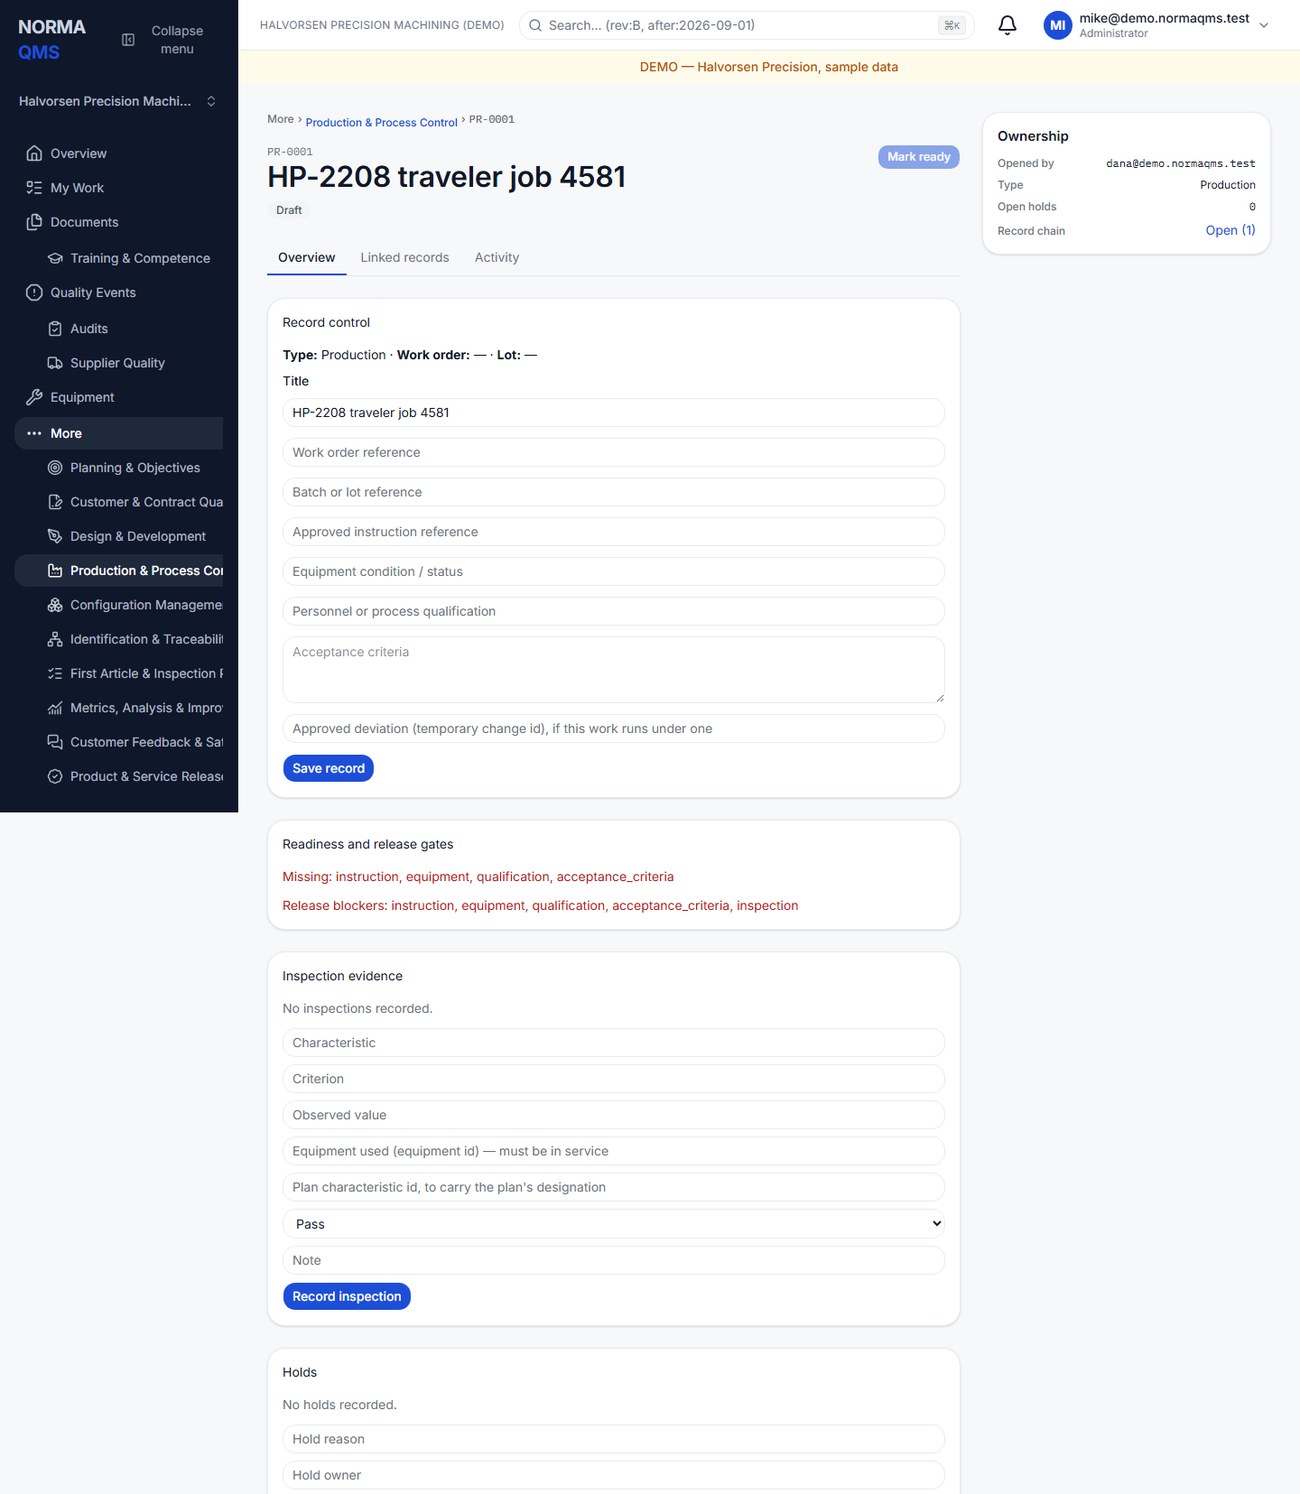
- Create a record with title and type: Production, Service, Special process, or Inspection. A record opened by Traveler at job release arrives already titled and filled from the router (chapter 20).
- In Draft, enter work-order and batch or lot references. If the work runs under an approved temporary change, enter it as the Approved deviation; the record then reads Runs under deviation …; checked at every step and at release.
- Record the approved instruction reference, equipment condition or status, personnel or process qualification, and acceptance criteria.
- Save the record. The Readiness and release gates card lists what is still Missing and the current Release blockers, as field keys such as
instructionorfailed_inspection; the four controlled-condition fields are required for readiness. - Select Mark ready, then Start production when the work begins.
Describe the actual controls for this work. A text statement about calibration does not automatically check an equipment relationship; use a precise asset reference and confirm the equipment record yourself.
Record inspection evidence
Enter the characteristic, criterion, observed value, the Equipment used (which must be in service), the result, and a note. Results are Pass, Fail, or N/A. Use Record inspection and confirm the new entry. Include units and acceptance limits in the criterion and observed value so another person can interpret the result. A result against a characteristic of a released inspection plan is recorded on that characteristic's row in the First article card instead (below); this form is for checks outside the plan.
For example: characteristic “Hole diameter 1,” criterion “10.00 ±0.05 mm,” observed value “10.08 mm,” result Fail. Record what was measured, not merely “bad hole.”
The AQL calculator
The AQL calculator is a free tool at /tools/aql-calculator. Enter a lot size, an inspection level, what you count, an AQL and the inspection state, and it gives you the sampling plan from MIL-STD-105E: how many to inspect, and the most nonconforming you can find and still accept the lot.
In this section: What you get · The operating characteristic · The switching strip · The source · Where it runs
What you get
The answer is a sample size, an acceptance number (Ac) and a rejection number (Re), with the table and code letter they came from. Find Ac or fewer and accept the lot; find Re or more and reject it. If the table sends you to another plan with an arrow, the tool says so and shows the plan it landed on. If the sample would be at least as large as the lot, it says to inspect every part and accept only on zero (the tool's rule; the standard gives no acceptance number for 100% inspection). On reduced inspection, a count between Ac and Re accepts the lot but returns you to normal inspection for the next one, and the tool says that too.
Enter the lot size as a whole number; commas are fine. Anything the tool cannot use gets a plain message saying what to change.
The operating characteristic
Under the plan the tool shows the probability of accepting a lot at the AQL, the quality level at which lots are accepted 95% of the time and the level at which they are accepted 10% of the time, and a curve. The figures are computed for a continuing process: the binomial distribution when you count percent nonconforming, the Poisson when you count nonconformities per 100 units, with Re - 1 as the acceptance number.
The switching strip
Below the calculator, the strip lets you work through MIL-STD-105E's switching rules. Record each lot as accepted or rejected (or, on reduced inspection where the plan has one, a gap result), and the strip shows the inspection state for the next lot with the reason, in the standard's terms: tightened after 2 out of 2, 3, 4 or 5 consecutive lots rejected (§4.7.1), back to normal after 5 accepted (§4.7.2), reduced when the conditions of §4.7.3 are met and you approve it, and back to normal under §4.7.4. You can also record that production became irregular. When 5 lots are not accepted on tightened inspection (§4.8), the strip says that inspection under the standard is discontinued until corrective action is taken; record it and carry on.
Changing the AQL, the inspection level, the lot size or what you count starts a new run of lots and clears the strip.
The strip is for working through the rules. It does not save anything.
The source
The tables and rules come from MIL-STD-105E (10 May 1989), a U.S. Department of Defense standard released for public use. ASQ describes ANSI/ASQ Z1.4 as an American national standard with direct lineage to MIL-STD-105E, and says the Department of Defense recommended it as the replacement when it stopped supporting MIL-STD-105E. ISO 2859-1 is the international acceptance sampling system for inspection by attributes indexed by AQL. The tool implements MIL-STD-105E; it is not Z1.4 or ISO 2859-1, and those standards may differ in details. It covers single sampling only.
Where it runs
The calculator runs in your browser. Nothing you enter leaves your computer. It remembers your last entries (lot size, level, AQL, inspection state and what you count) in this browser only, and the switching strip's lots are not kept. Emptying the lot size field clears what it remembers.
Record a first article
The First article card on the production record holds the first article inspection for the job.
- Choose the released Inspection plan the job runs to. Only released plans are offered.
- Choose the First article reason: First article, Part revision change, Process change, Tooling or location move, Lapse in production, Supplier change, Corrective action, or Partial first article.
- Enter the Standard and form revision used, for example the customer's form and its revision, and choose Save first article details.
- On each characteristic's row under Characteristics and results, enter the observed value, the equipment where offered, and Pass, Fail, or N/A, then choose Record result. A key characteristic still needs an observed value.
- For a Fail, raise a nonconformance from the failed row and work it to closure (chapter 24). The failed result stays as recorded.
The card lists what is outstanding: characteristics with no result, failures not yet covered, and record fields still blank. When all are clear it reads First article report complete. Choose Open the first article report to read or print it, or Download it as CSV. The report carries the record identity, the plan and configuration reference, every result with its inspector and any linked nonconformance, the discrepancies, and the release of the production record once released. Norma uses its own report layout and reproduces no industry form; the standard and form revision you recorded is printed on it. First article completeness is reported, not a release gate.
Manage holds
Use Open hold with a reason and owner when work must be controlled. Resolve a hold with a note describing the resolution evidence. An open hold blocks release. A failed inspection does not automatically create a hold, and opening a hold entry should not be assumed to change every status or stop a machine.
Do not confuse the hold list with the overall lifecycle state. Follow the offered status controls and your shop's physical segregation or stop-work process. Record containment in an NC where appropriate.
Release the production record
After work, choose Submit for release. Release requires all readiness information, at least one inspection, no uncovered failed inspection, and no open holds. The quality manager then selects Release record, which stays disabled until the gate passes.
A Fail is never edited or erased, and adding a passing entry does not clear it. It is covered when a nonconformance has been raised from that inspection row and that nonconformance is Closed; the row then reads Covered. If that nonconformance was closed under a concession that has since expired, been exhausted, or cannot be shown to hold, the Fail is uncovered again: the row reads, for example, Concession expired, and release is blocked until the replacement concession is recorded (chapter 24). Until then the row reads No nonconformance raised — release is blocked until one is raised and closed, and the Readiness and release gates card lists each uncovered failure with its characteristic and the linked NC's reference and status. Use Raise NC on the failed row to open the linked nonconformance, disposition and close it under chapter 24, and the release gate clears on its own. A job run through Traveler reaches the same place from the tablet: a failed characteristic there needs a nonconformance before the operation completes (chapter 21).
Example: Hole 1 on job 4590 measures 10.08 mm against 10.00 ±0.05 — Fail. The technician chooses Raise NC on that row; the NC is dispositioned Rework, the parts are re-machined and re-inspected, the verification is recorded, and the quality manager closes the NC. Back on the production record the row now reads Covered and Release record is enabled. The Fail is still there, with the NC beside it — which is exactly what the customer's source inspector will ask to see.
The normal lifecycle is Draft, Ready, In process, Awaiting release, Released, with Held and Cancelled branches where supported. Released and Cancelled are terminal. Release of this record shows completion under controlled conditions. Product & Service Release is the separate authorization to release the product or service to the customer.
Process capability (Cp, Cpk, Pp, Ppk)
A capability study answers the question a customer asks about a feature: does this process make it inside the tolerance, consistently, with room to spare? Norma keeps a register of the characteristics you measure, a running record of their measurements, and numbered capability studies (CAP-####) that freeze a set of those measurements, compute the indices, and are approved by a second person.
In this section: Add a characteristic · Add measurements · Correct a measurement · Run a study · Read the result · Approve a study · Raise a nonconformance · The free calculator
Open: More > Production & Process Control, then Process capability at the top of the page. Typical leads: Quality Manager, engineer or department manager for setup; quality manager, executive or an administrator for approval; inspectors and department managers enter measurements. Needs: the Production & Process Control module.
The job runs in this order: add a characteristic, add measurements, run a study (a frozen set of those measurements plus the settings used to analyze them), then have a second person approve it. A study can later show Needs re-analysis if a measurement in it is corrected or the limits change before approval; the sections below explain when.
The register lists each characteristic with its Part, Feature, Specification, Gauge, Gauge MSA, Measurements and Latest approved result. Show archived adds the characteristics you have archived.
Add a characteristic
- Choose Add characteristic.
- Enter the Part number and the Feature (for example "Bore Ø"). If the drawing balloons the feature, enter the Balloon number (optional).
- Enter the limits: Lower limit, Upper limit, or both, and the Nominal and Unit if you have them. At least one limit is required. For runout, position, flatness or roughness, give only the upper limit.
- If the feature can never go below a value (runout, position and flatness never go below 0), enter it as the Natural bound (optional). It helps Norma fit skewed data honestly. A lower limit at or below the natural bound is a physical boundary: no part can fall below it, so Norma assesses only the upper side (Cpl, Ppl, Cp and Pp show "—"). A characteristic with only a lower limit, at or below its natural bound, is refused: "This limit cannot be violated, so there is no capability question. Check the drawing or the natural bound." Norma treats a limit as impossible to violate only when you enter a natural bound; it never assumes one. The form reminds you: "Is 0 a physical limit, such as runout or flatness? Enter it as the natural bound." On the characteristic page, Change limits shows the same reminder when the saved lower limit is 0 and no natural bound is set.
- Pick the Gauge (optional) if it is on the equipment register. Linking it shows the gauge's MSA status on the register, on the characteristic and on every study.
- Choose Add characteristic.
On the characteristic page, Edit details changes the part number, feature, balloon number, unit and gauge. A study keeps the part number, feature, balloon number, unit and gauge (with the gauge's MSA status) it was analyzed with, and its report shows those, so editing the details later never rewrites an approved report. Change limits changes the nominal, the limits and the natural bound, and each change that carries a reason is recorded with who made it, when, and every value it changed (nominal, limits and natural bound). Reason is optional until the characteristic has an approved study; after that Norma will not save a limit change without one (for example, the drawing revision). Approved studies keep the limits they were computed with.
If a limit change is saved while a study is Analyzed — awaiting approval, that study goes back to Needs re-analysis, because its numbers were computed against the old limits. Norma tells you which study it was, and the study says the specification limits changed after its analysis.
Archive this characteristic takes it off the register's default view and stops new measurements and studies. The record stays.
Add measurements
On the characteristic page, under Add measurements, use whichever fits how you collected the data:
- The grid: set Parts per subgroup (1 = single readings), type one subgroup per row, optionally set Measured on, and choose Save measurements. Add 5 rows gives you more rows. A row that is only partly filled is refused by its row number, never padded.
- Paste from Excel: paste one value per line, or one subgroup per line with the parts across, and choose Add pasted measurements. A heading line is skipped.
- Import CSV: choose a file in the same layout as a paste, then Import CSV. The file may be up to 2 MB.
Use a decimal point, with no thousands separators or units. Norma never guesses: a line it cannot read is refused with its line number, and nothing from that paste or file is saved. In particular, a line such as 10,02 is refused, because a comma could be a decimal comma or a separator between two values. If you mean two values per subgroup, separate them with a tab, which is what Excel does when you copy cells.
Each new batch continues the subgroup numbering, so a second paste never merges into an earlier subgroup. Every measurement records who entered it. Measurements keep the order you entered them: by measured date, and within one paste, file or grid in the order of the lines. Studies, control charts and "the most recent" use that order, so paste the values in the order the parts were made.
Tip: A capability study needs at least 20 measurements and, when you analyze in subgroups, at least 5 subgroups. Norma shows a small-sample warning unless there are at least 100 measurements and, when analyzed in subgroups, at least 25 subgroups. With fewer, the lower confidence bound reflects it, so the study is harder to pass.
Correct a measurement
Measurements are never deleted. The table shows the latest 500 measurements, newest first. In it, choose Correct next to the value, enter the corrected value and a Reason, and choose Record correction. The original value, the reason, and who corrected it stay with the measurement, shown as "was …" beneath the new value.
- If the measurement is in a study that is Analyzed — awaiting approval, the study goes back to Needs re-analysis and Norma names it; the study says a measurement was corrected after its analysis. Open the study and choose Re-analyze to compute it again on the corrected values.
- If the measurement is in an approved study, the approved numbers do not change. The study and its printed report say a measurement was corrected after approval, and you can start a new study to supersede it.
Whoever corrects a measurement counts as having worked on the study, so they cannot approve it (see the approval section).
Run a capability study
- On the characteristic page, choose Start capability study. With fewer than 20 measurements the link is replaced by a note saying how many more measurements you need. A rail across the top shows the whole job: Set up, Collect measurements, Analyze, Approve.
- Which data: All measurements, The most recent (a number you enter; with subgroups it counts whole subgroups), or Between two dates. Use data from the process as it runs now, after the last change to the tool, fixture, program or material. The count of selected measurements is shown at the top and updates as you choose; it counts every measurement on the characteristic, however many there are.
- How it is grouped: In subgroups (consecutive parts measured together, for example 5 parts every hour; enter Parts per subgroup) or Single readings. Subgroups must all be the same size.
- What the customer requires: Cpk ≥ 1.33, Cpk ≥ 1.67, or The customer's value. Advanced statistics holds the Confidence level for the lower bound (95% by default) and the Method (Automatic (recommended) by default). Leave them alone unless your customer specified something else.
- Review and analyze shows what you chose. Choose Analyze. If the data cannot support a study (too few measurements or subgroups, or a subgroup of the wrong size), Norma says so and records nothing.
Choosing Analyze creates the study (CAP-####) and computes its result in one step. The study starts at Analyzed — awaiting approval. Study numbers are never reused.
When the characteristic already has an approved study, a new study automatically replaces it: the new study says "Supersedes CAP-#### once approved". The earlier study stays Approved until the new one is approved; then it becomes Superseded, and both stay on record. Only one study can be in progress against an approved study at a time.
A characteristic has at most one approved study at a time. If two studies were analyzed before either was approved, approving the first is fine, but the second is refused: "Another approved study of this characteristic exists (CAP-####). Start a new study from it so it is superseded."
Read the result
What the numbers mean
- Cp and Cpk use the short-term spread, measured within subgroups (or between consecutive single readings). They describe what the process can do when it is running as it should. Cp compares the full tolerance width with that spread; Cpk also accounts for how far the average sits from the nearer limit.
- Pp and Ppk use the overall spread of all the data, including drift between subgroups. They describe what the process actually did over the period measured. Subgroups are what let Norma separate the two.
- Cpu and Cpl are the upper-side and lower-side halves of the index: how much room there is before the upper limit and before the lower limit. Cpk is the smaller of the two.
- The governing index is the one the verdict is judged on. The verdict sentence names it.
- The lower confidence bound (95% unless you chose otherwise) is the value the true index is unlikely to fall below, given how much data you have. A small sample gives a lower bound well under the calculated index, so Norma judges the lower bound against the requirement.
- Anderson-Darling is the normality check. Norma runs it first to decide whether the usual bell-curve calculation fits your data.
- Box-Cox is a transformation that reshapes skewed data so the normal calculation can be applied to it.
- The ISO 22514-2 percentile method fits a distribution to the data and reads the capability from its tails, for data that is neither normal nor fixed by a transformation.
The study page states the verdict first, in plain words, for example "Capable. Cpk 1.62 (95% lower bound 1.41) meets the required 1.33."
- Capable: the lower confidence bound of the governing index meets the requirement.
- Marginal — more data needed: the index itself meets the requirement but its lower bound does not. Collect more data before relying on it.
- Not capable: the index is below the requirement.
- Not valid: for one of three reasons, which the verdict sentence names:
- no method fits the data;
- the method you forced does not fit the data;
- no index can be reported for this specification and method (see the warnings).
Stability review required. When the control charts show a signal (a point beyond a control limit, or a run of 9 on one side of the center line), the verdict still stands, but it is marked with a bordered Stability review required notice that lists each signal. Cpk does not describe a process with signals, so the verdict is then judged on Ppk. Review the signals before relying on the verdict: the approver records whether an assignable cause was found and what was done (see the approval section).
Below the verdict are any warnings, the indices with their lower bounds (Cp, Cpk, Cpu, Cpl alongside Pp, Ppk, Ppu, Ppl), the statistics, the histogram with the limits, the normal probability plot, the control charts, and the Method Norma used and why. Norma checks normality first (Anderson-Darling). If the data is not normal, it tries a Box-Cox transformation, then the ISO 22514-2 percentile method. Box-Cox cannot be used when a limit sits at or below the lowest point it can transform (zero, or just below your data's minimum); Norma then says so and moves on to the percentile method. Under Box-Cox the control charts plot the transformed values, and their captions say "(Box-Cox transformed)". With a one-sided limit, only that side's index is reported and Cp and Pp show "—"; the same is true of a lower limit at or below the natural bound, which is a physical boundary.
The percentile method's lower bound comes from refitting the distribution to 1,000 resamples of your data. If fewer than 90% of those refits succeed, Norma reports no lower bound and says so, and the study cannot be judged Capable.
Warnings include a small sample, signals on the control charts (the stability review), measurements outside the specification, a lower limit at the fitted threshold with no natural bound (Ppl then comes out close to 1 whatever the process does: if the limit is physical, enter it as the natural bound), a one-sided specification, a lower limit at or below the natural bound, values below the natural bound (which should not be physically possible: check the measurements and the bound), and bootstrap refits that failed. The gauge's MSA status is stated on the characteristic as it is today; the report header gives it as it was when the study was analyzed ("MSA at analysis"). When the gauge has no approved MSA, or its MSA is not acceptable, the text says the capability numbers include gauge error.
Choose Print / Save as PDF for the report. It carries the engine version, the input fingerprint, who analyzed and approved it, and every measurement in the study, with corrected values marked. A report that is not the current approved evidence says so at the top, both on the study page and in print:
- NOT APPROVED while the study is awaiting approval;
- NOT CURRENT while it needs re-analysis, naming what happened: the specification limits changed, or a measurement was corrected, after the analysis;
- SUPERSEDED once a later approved study replaces it;
- a notice that a measurement was corrected after approval, when that is true of an approved study.
Approve a capability study
Approval is by someone who did not enter or correct any measurement in the study, and who is a quality manager, an executive or an administrator. The study page names who is eligible; if nobody is, it tells you to give a quality manager or executive role to someone who did not enter the data. If you entered measurements yourself, the page says a second person must approve it.
An approver chooses Approve CAP-####. A marginal result needs a written Justification (required for a marginal result) first. A result whose control charts show signals needs a written Stability review: was an assignable cause found for the signals, and what was done? Norma will not approve it without one ("Record your stability review: was an assignable cause found?"). Once approved, the review is printed on the report next to the justification and can no longer be changed. Norma refuses to approve a result that a newer analysis has replaced; approve the current one. A study that needs re-analysis cannot be approved until it is re-analyzed.
Raise a nonconformance from a study
When an approved study is Not capable, and your organization uses nonconformance, the study page offers Raise a nonconformance. Choose where it was Detected at and Raise nonconformance. Norma opens a nonconformance that names the study, the requirement and the verdict. Only an approved not-capable result of the current study can raise one, and only once per result; a superseded study cannot. You need permission to raise nonconformances and access to Production as well.
The free capability calculator
/tools/capability computes the same indices in your browser from pasted measurements. It does not need an account. Nothing you paste is sent anywhere; the page keeps your paste in your browser so you can come back to it, and Clear removes it (use it on a shared computer). It reads the paste the same way the register does, so a line like 10,02 is refused there too. The report is marked "Free calculator — not a controlled record."
SPC charts (statistical process control)
A capability study looks back at one slice of time. An SPC chart watches the process as it runs. Norma judges every new reading against control limits that a second person approved. When a reading or a pattern of readings shows the process is not behaving as it did when the limits were set, Norma opens a signal. A signal stays open until someone records what caused it and what was done.
In this section: Set up a chart · Set control limits · Approve limits · Readings and signals · Review a signal · Readings from the Traveler · Floor displays · Print
Open: More > Production & Process Control, then Process capability, then a characteristic, then Open the SPC chart (or Set up SPC). Typical leads: quality manager, engineer or department manager to set up charts and calculate limits; quality manager, executive or an administrator to approve limits; inspectors and department managers enter readings and review signals. Needs: the Production & Process Control module.
The work runs in this order:
- Set up a chart.
- Collect a baseline of readings.
- Calculate control limits.
- Have a second person approve them.
From then on, every new reading is judged as it is saved. The register's SPC column shows each chart's standing: Baseline phase: no approved limits yet, In control, or the number of open signals.
Set up an SPC chart
On the characteristic's SPC page, enter Parts measured together (subgroup size). Use 1 for single readings, or the number your inspectors already measure at once. Then choose the Chart:
- Individuals and moving range (I-MR) for size 1.
- X̄ and range (X̄-R) for 2 to 9.
- X̄ and standard deviation (X̄-S) for 10 or more.
A chart's type and size are fixed. To change them, Retire this SPC chart and set up a new one. A chart with open signals cannot be retired: review its signals first.
Set control limits
Set control limits opens three steps:
Baseline. Choose the readings the limits come from. You can pick the first N subgroups on the chart (25 or more is recommended, 20 is the minimum), the readings measured between two dates (taken in the order they were recorded), or the data of an approved capability study. Fewer than 20 is refused. Fewer than 25 subgroups (or 100 single readings) is accepted with a warning.
Rules. A point beyond a control limit is always on, on both charts. You may add any of these:
- Nine points in a row on one side of the center line catches a small, steady shift.
- Two of three points beyond 2σ on the same side catches a larger shift sooner.
- Four of five points beyond 1σ on the same side catches a moderate shift.
- Six points in a row rising or falling catches tool wear or drift.
More rules catch smaller shifts sooner and also raise more false alarms. The page tells you how often a stable process will still signal with the rules you chose: about once every 365 points with the first rule alone, and once every 80 with all five.
Review. Norma shows the center line, the control limits and the limit for the spread chart. If the baseline itself breaks a rule, the page says which points. You can exclude a point that had a known cause: choose the reading (or the subgroup), give the reason, then Exclude and recalculate. Each exclusion keeps its reason on the record. Otherwise keep the points, and the approver records a stability review.
The page also says which points the new limits will not judge: only readings recorded (or subgroups completed) after approval are judged against them.
Calculate limits version N for approval saves the limits as a draft. Once the chart has approved limits, new limits need Why new limits? (process change, new gauge, material change …). A redraft after you discard a first draft that was never approved needs no reason.
Approve control limits
The draft shows who can approve it: someone with the quality manager or executive role (or an administrator) who did not calculate the limits and did not enter or correct any baseline reading. If the baseline showed signals, the approver must fill in Stability review. If a baseline reading was corrected after the limits were calculated, approval is refused: calculate the limits again. Approve limits version N makes them current. The previous version is marked superseded, and every reading it judged keeps it. Discard this draft drops a draft that should not be approved.
Readings and signals
Readings are added on the characteristic page exactly as for a capability study: the grid, a paste from Excel, or a CSV file. The chart plots readings in the order they were recorded. A reading entered later with an earlier measured date is plotted where it was recorded, and correcting a reading's date does not move it. Readings (or subgroups) completed before any limits are approved are the baseline phase: they are drawn hollow and gray, and nothing judges them. Once limits are approved, each new reading (or each completed subgroup) is judged as it is saved:
- A reading that waits for its subgroup to fill is listed as waiting and is not judged yet.
- A subgroup that can never complete is listed as not judged.
- When a reading breaks a rule, the page you saved from says Out of control: SIG-0001 opened, with a link to the chart.
On the chart, a point in an open signal is larger, red, ringed and numbered. A point in a reviewed signal keeps a dark ring. Each stretch of points is drawn against the limit version that judged it, so a new version shows as a step.
A breach that continues on the same side of the center line (or, for a trend, in the same direction) extends the same open signal rather than opening a new one. A breach on the other side opens a new signal. A correction re-judges the chart: if none of an open signal's points still breaks its rule, the signal is marked Withdrawn by a correction and names the correction. It stays on record. A reviewed signal is never changed by a correction: it keeps its points, and those points do not signal again under the same rule. Only points that no open or reviewed signal of that rule already holds can open a new signal; the points of a withdrawn signal can.
Every open signal is also in the work queue, with its age, for everyone who can record production results. The Production & Process Control page shows Open SPC signals: N, which opens the register filtered to the characteristics with open signals.
Review a signal
Open the signal from the chart or the work queue and answer three things:
- Was an assignable cause found?
- What was done? (adjusted the process, contained parts, no action needed, other)
- Notes, which are required when a cause was found or for "Other".
Record review closes the signal. A reviewed signal cannot be changed. From a reviewed signal you can Raise a nonconformance (when the Nonconformance module is active) or Open a CAPA (when the CAPA module is active), if your role allows it; otherwise the page says which module is needed or who can. Each is prefilled from the signal, including the readings it covers with their times, and linked to it, once each.
Readings from the Traveler
If your inspectors record this feature on a NormaMES Traveler, link the router check on the characteristic's SPC page:
- Choose the check under Link a router check (part · router and version · operation · check, with its criterion and stage).
- Click Link check.
From then on, numeric results recorded on that check are charted when they are signed off. A result belongs to the check with the same characteristic, criterion and stage at that operation, and the inspector who recorded it is the reading's enterer. A result marked N/A is never charted. A value with units or text, such as "12.01 mm", is never guessed. Every linked result that is not charted is listed under Linked results not charted, with the reason:
- not a number: record the measured number only, with no units.
- ambiguous check: the router has two checks with the same characteristic, criterion and stage at that operation, so Norma cannot tell which was measured. Make the checks distinct on the router.
- not charted (SPC error or not entitled): a numeric result signed when SPC could not chart it. Chart again charts these.
A check feeds one characteristic, and a result is charted once. When a new router version is released, the page says link the new version.
SPC floor displays
SPC floor displays (from the Process capability page) creates a link for a screen on the floor:
- Name the screen.
- Choose up to six charts.
- Click Create display link.
The link is shown once. Open it on the screen. It needs no login, shows the last 100 points of each chart read-only (no names or notes), refreshes every 30 seconds, and turns a chart's frame red with SIGNAL: notify quality when it has an open signal. Anyone with the link can view it, so Revoke a link you no longer use.
Print the SPC record
Print on the SPC page prints the chart, every signal with its review, and each limit version with its baseline, exclusions, approvals and stability review. A notice at the top says whether the limits are current or the chart is still in its baseline phase.
Attribute charts (counts of defectives and defects)
Some characteristics are not measured but counted: how many boards in a lot have a solder void, how many blemishes are on a painted panel. Norma charts these on attribute charts. Each sample is how many parts (or units) were inspected and how many failed (or how many defects were found). Every new sample is judged against control limits that a second person approved, and anything out of control opens a signal, exactly as on an SPC chart of readings.
In this section: Add an attribute characteristic · Add samples · Choose the chart · Set and approve limits · Samples and signals · Counts from the Traveler · Displays and print
Open: More > Production & Process Control, then Process capability, then Attribute characteristics (pass/fail counts). Typical leads: quality manager, engineer or department manager to add characteristics, set up charts and calculate limits; quality manager, executive or an administrator to approve limits; inspectors and department managers enter samples and review signals. Needs: the Production & Process Control module.
Add an attribute characteristic
Click Add attribute characteristic and give:
- the Part number;
- What is counted, for example "Boards with solder voids";
- the Count: Defective parts (each part passes or fails, so the count can never be more than the parts inspected) or Defects (one unit can have several).
The count is fixed once saved. To count the other way, add a new attribute characteristic. Edit details changes the part number and what is counted. Archive this characteristic removes it from the register (use Show archived to see it). An archived characteristic takes no samples and no new chart.
Add samples
On the characteristic page, under Add samples, use any of these:
- The grid. Up to 10 samples at a time: the Sample size and the count (Defective or Defects) on each row. Leave a row blank to skip it. A row with only one of the two is refused. Date sampled is optional; it is today if left blank.
- A paste from Excel. One sample per line: the sample size, a tab, then the count, for example
50then2. If no line has a tab, the lines may use a comma instead. A first line is skipped as headings only when every cell is a word. - A CSV file. One sample per line, with a comma between the sample size and the count.
The paste and the CSV file each take an optional Date sampled, as the grid does; it is today if left blank. Nothing is guessed. A paste uses one separator throughout: when any line has a tab, a line with a comma is refused, because there a comma can only be a thousands separator or a decimal comma. A line such as 2,000 (up to three digits, a comma, three digits) is refused as a possible thousands separator: use a tab, or remove the comma. A line with a decimal (2.5), a sign, a leading zero (007), a number above 2,147,483,647, an empty cell, a sample size of 0, more or fewer than two values, or quotes is refused with its line number. So is a count of defectives above the sample size: Norma never swaps the two numbers. If one line is wrong, nothing from the paste is saved. A paste or file may hold up to 2 MB.
Samples are listed newest first, with who entered them and where they came from. Correct on a sample changes its size and count with a reason. The sample shows what it was before, and who corrected it and why. Samples are never deleted.
Choose the attribute chart
On the characteristic page, click Set up SPC, then choose the Chart:
- For defective parts: Proportion defective (p), which takes samples of any size, or Number defective (np), which takes samples that are always the same size.
- For defects: Defects per unit (u), which takes samples of any size, or Number of defects (c), which takes samples that are always the same size.
For an np or c chart, also enter the Sample size every sample has. From then on a sample of another size that you enter is refused, with a message naming the sample size the chart takes; a Traveler job of another size is listed as not charted. To chart samples of different sizes, retire the chart and set up a p or u chart. A chart's type and sample size are fixed. An archived characteristic takes no samples.
Set and approve attribute limits
Set control limits opens the same three steps as for readings, using samples:
- Baseline. The first N samples (25 or more is recommended, 20 is the minimum), or the samples taken between two dates. Fewer than 20 is refused; fewer than 25 is accepted with a warning. A baseline with no defectives (or no defects) is refused, because no limits can be set from it, and so is one where every part was defective.
- Rules. The same rules as for readings. On an attribute chart every rule judges each sample's standardized value (z): how far it sits from the center line in units of that sample's own standard deviation, so samples of different sizes are compared fairly. For a p or u chart, the rising-or-falling rule follows the standardized values rather than the raw proportions. Whether a sample is beyond a limit, or beyond 1σ or 2σ, is decided exactly in whole numbers, so a count exactly on its limit is on it, never beyond it by rounding.
- Review. The center line and the control limits. On a p or u chart, each sample has its own limits: wider for a small sample, tighter for a large one. The page states the limits at the baseline's average sample size and says each sample has its own. On an np or c chart the limits are the same for every sample. A lower limit below zero is shown as 0.
Attribute charts do not quote a false-alarm rate. Counts are whole numbers, so the rates quoted for measured characteristics do not apply. A stable process still signals occasionally, so an occasional signal with no cause found is expected.
Approval works as for readings. The approver must hold the quality manager or executive role (or be an administrator), must not have calculated the limits, and must not have entered or corrected any baseline sample, or recorded any of the Traveler results a baseline sample counts. If a baseline sample was corrected after the limits were calculated, approval is refused: calculate the limits again.
Samples and signals
Before limits are approved, samples are drawn hollow and gray and nothing judges them. Once limits are approved, each new sample is judged as it is saved, against its own limits. When a sample breaks a rule, the page says Out of control: SIG-0001 opened, with a link to the chart. On an np or c chart, a sample of another size (one entered before the chart was set up, for example) is not drawn or judged, and the chart says how many there are.
The chart draws each sample's limits as a stepped line. A point in an open signal is larger, red, ringed and numbered; a point in a reviewed signal keeps a dark ring. A breach that continues extends the same open signal. A correction re-judges the chart: when the points of an open signal no longer break its rule, the signal is marked Withdrawn by a correction and stays on record, with the time it was withdrawn.
Signals are reviewed exactly as on a chart of readings. A nonconformance raised from an attribute signal names each sample it covers, for example "6 defective of 20", with its time. Every open signal is in the work queue with its age, and the Production & Process Control page shows Open attribute SPC signals: N, which opens the attribute register filtered to the characteristics with open signals.
Counts from the Traveler
If your inspectors record a pass/fail check on a NormaMES Traveler, link it on the attribute characteristic's page, under Counts from the Traveler:
- Choose the check under Link a router check.
- Click Link check.
From then on, when a job operation is completed, its results on that check become one sample: the number of parts inspected is the sample size, and the number of those parts that failed is the count. A retake counts once: the floor records no part number, so every result on that check after a Fail, up to and including the next Pass, is taken as a retake of the failed part, whether or not a nonconformance was raised. A Fail followed by a passing retake is one part that failed. The known consequence: if a scrapped part is replaced and the new part is inspected, the new part's result is taken as a retake, and n is undercounted by one. Results marked N/A are left out. One job operation gives one sample, never more. The inspector who recorded the last result is the sample's enterer, every inspector of a counted result or retake is recorded on the sample, and the sample is dated when the last result was recorded. Only jobs whose results were all recorded since the check was linked are charted.
A check feeds one chart, whether a chart of readings or an attribute chart. An attribute characteristic takes one check per router operation. Every completed job with linked results that has no sample is listed under Completed jobs not charted, with the reason:
- not charted: sample size differs: an np or c chart takes one sample size, and that job recorded a different number of results.
- ambiguous check: either the router has more than one check with the same characteristic, criterion and stage at that operation, or this characteristic is linked to more than one check on that operation.
- not charted: inspected before the link: some of that job's results were recorded before the check was linked, so its count would be partial. A job inspected wholly before the link is not listed.
- not charted (SPC error or not entitled): the job completed when SPC could not chart it. Chart again charts these for this characteristic only, in the order their last results were recorded.
Displays and print
Attribute charts can be chosen for an SPC floor display, like any other chart. Print on the attribute chart page prints the chart, every signal with its review, and each limit version with its baseline, exclusions, approvals and stability review, under a notice that says whether the limits are current.
Validation (processes, equipment and software)
AS9100 8.5.1.2 and ISO 13485 7.5.6 ask you to validate special processes and the equipment that runs them; ISO 13485 4.1.6 and 7.5.6 ask the same of software used in your quality system or in production. The Validation workbench makes each validation a controlled record: a protocol of typed criteria that a second person approves before anything is run, results that Norma judges as you enter them, deviations with dispositions, and an independent approval of the executed validation. Each subject then carries a live status.
In this section: Add a subject · Write the protocol · Pre-approve it · Execute it · Deviations · Approve or close failed · Status and revalidation · Print
Open: More > Production & Process Control, then Validation. Typical leads: a quality manager, engineer or department manager (or an administrator) adds subjects and writes protocols; a quality manager or executive (or an administrator) pre-approves protocols, approves deviations and approves executed validations; a quality manager, department manager or inspector (or an administrator) starts execution, records results and raises deviations. Needs: the Production & Process Control module.
Add a validation subject
Click Add a subject and choose what is validated:
- a Process, for example a heat treat, a weld procedure, sealing, cleaning or passivation;
- Equipment, chosen from the calibration register;
- Software, with its name and version.
Give it a Name and an Owner (who answers for it), and optionally a Description. Revalidate every (months) sets periodic revalidation, from 1 to 120 months; leave it blank for none.
What a subject is (its kind, and its equipment) is fixed once saved. Edit details changes the name, owner, description and revalidation interval. A new interval applies to validations approved from then on: each approval records the interval in force when it is signed, and a later edit does not move its date. A software subject's name and version can be changed only until a validation of it is pre-approved; for a new version of the software, add a new subject. Archive this subject removes it from the register when none of its validations is still open; an archived subject stays on record, stays archived and takes no new validation.
Write the protocol
On the subject's page, Start a draft validation with its stages (IQ, OQ and PQ; at least one) and, optionally, its purpose. Norma numbers it VAL-#### and never reuses a number.
Add the criteria, stage by stage. Each criterion says What must be shown, optionally the Planned condition (for example "OQ low: 180 °C, 2 h"), and its kind:
- Check (evidence): the evidence it needs: a note, a file, or both.
- Value (readings within limits): how many readings, the lower and/or upper limit, and the unit.
- Capability (engine): the lower and/or upper limit, the required index (1.33 unless you change it), the confidence (0.95), the method, the minimum number of readings (at least 20, the engine's own minimum), and an optional natural bound.
- Gauge MSA: the gauge, from the calibration register.
While the validation is a draft you can edit any criterion, Move up or Move down, and Remove from the draft (a removed criterion stays on record as removed). Edit stages, purpose and reason changes the rest; a stage that still has criteria cannot be dropped. Whoever edits the stages, purpose or reason becomes one of the protocol's writers.
A new version. When the subject already has a validation, the subject page offers Start version N: it copies the latest validation's stages, purpose and criteria into a new draft, and asks Why a new version (for example, the annual revalidation, or new heating elements). Whoever starts it is the new protocol's author. A subject has one draft at a time.
Pre-approve the protocol
Pre-approve VAL-#### is for a quality manager or executive (or an administrator) who did not write the protocol: not its author, nobody who added or edited one of its criteria, and nobody who edited its stages, purpose or reason. If you wrote it, the card names who can. Every stage needs at least one criterion first.
Pre-approval freezes the protocol: nothing in it changes afterwards. Like every signature in a validation, it records your name as it stands in Norma, the date and time, and what the signature means (here, "Pre-approved the protocol"). A later version, once pre-approved, supersedes every earlier version of the subject. An earlier approval still counts toward the subject's status until the new version closes.
Execute the validation
Start executing VAL-#### begins execution; no result can be recorded before it. Then record each criterion. Norma judges every result as soon as it is saved:
- Check: say whether the requirement was Met or Not met, and give the evidence the protocol asks for (the note, the file, or both). It passes only when it was met and the evidence is there.
- Value: it passes when there are at least the planned number of readings and every reading is within its limits. A reading equal to a limit is within it.
- Capability: Norma runs its capability engine (the one capability studies use) on the readings, taken one at a time. It passes when the engine gives a valid verdict and the lower confidence bound of the governing index is at or above the required index. If the control chart of the readings shows a signal, the criterion is not failed for it, but the approver must record a stability review.
- Gauge MSA: Norma takes the gauge's latest approved MSA as it stands at that moment and keeps that snapshot with the result. It passes when that MSA is acceptable and nothing since suggests a new study: a failed or limited calibration, a calibration whose as-found value differs from its as-left value ("10.0" and "10.00" count as the same), or a current maintenance flag. Otherwise it fails. If you judge the prompt harmless, raise an Accept deviation with your rationale; a second person approves it.
Where readings come from. Every reading carries its source:
- type the readings, one per line, and say where they come from: Typed here from the instrument (entered) or Pasted from another record (imported). There is no default: you choose;
- or choose a CSV file with one reading per line (imported);
- or pull them from a characteristic's stream: choose a process characteristic and a measured-from and measured-to date (UTC calendar dates, both included), or choose a Traveler job from the list of jobs that put readings on a stream. Norma takes those readings in stream order and keeps each one's id and value. A later correction to the stream does not change the recorded result.
There is no other way to enter readings: Norma never generates or simulates data for a validation.
Corrections. Correct this result records a change with its reason, while the validation is executing, and Norma judges the result again. Both the old and the new data stay on record. A gauge MSA result keeps its snapshot (only its note can change). A check opens with its note filled in, and keeps its file unless you choose a new one (the replaced file stays in the evidence archive). Readings are corrected by keeping them and changing the note only, or by replacing them; readings pulled from a stream are never retyped: you pull them again. Once an approved deviation addresses a result, or a later attempt stands on it, it can no longer be corrected: raise a repeat instead.
Another attempt. Each criterion records one attempt at a time. A further attempt needs an approved repeat deviation of the attempt before it, and each repeat allows one attempt. Every attempt stays on record.
Deviations
Raise a deviation while the validation is executing, about one criterion (it addresses that criterion's latest attempt) or about the validation in general. Say What happened, its Impact on the validation, and the disposition:
- Accept: the result stands; a Rationale is required.
- Repeat: allows one further attempt at the criterion (it needs a criterion with an attempt on record).
- Fail: fails the validation.
Deviations are numbered DEV-1, DEV-2 and so on within each validation. Raising one is signed ("Raised deviation DEV-n"). A deviation is approved by a quality manager or executive (or an administrator) other than whoever raised it, and the approval is signed with its disposition ("Approved deviation DEV-n (accept)"). Until then it can be Withdrawn with a reason, by whoever raised it or by someone who holds approval; the withdrawal is signed too. Once approved or withdrawn, it is final. Approving a fail deviation closes the validation failed at once, so its approver must also be independent of the validation's data (see below); if you are not, the card names who can.
Approve the executed validation, or close it failed
The approval card lists everything that still stops approval. The executed validation can be approved when:
- every criterion's latest attempt passed, or an approved accept deviation covers that attempt;
- no deviation is waiting for approval or withdrawal, and no fail deviation was approved.
Approve VAL-#### is for a quality manager or executive (or an administrator) who is independent of the validation's data: who entered no result, correction or deviation in it, withdrew no deviation, and entered or corrected none of the stream readings its results hold. If you are not, the card names who can. For every capability result whose control chart shows a signal, write your stability review (was an assignable cause found?); each review is signed. You can add an approval note. The approval is signed ("Approved the executed validation") and records the subject's revalidation interval as it stands.
Close VAL-#### failed records why it failed; Norma adds what was still open. The same independence applies, and the closure is signed ("Closed the validation as failed"). A closed validation, approved or failed, is final; a new version starts from the subject page.
Status and revalidation
Each subject's status comes from its closed validations:
- Never validated until one closes.
- Validated until the day of the latest approval (on your organization's calendar, in its time zone) plus the revalidation interval that approval recorded (or Validated (no periodic revalidation)).
- Revalidation due from 30 days before that date through the date itself.
- Expired after it.
- Failed when the latest closed validation failed.
The register shows every subject's status and revalidation date. From 30 days before the date, the subject appears in the work queue (Revalidate) of everyone who writes protocols, and it turns overdue once the validation has expired. When a subject's latest validation failed and no newer version has been started, it appears as Plan a new validation. Archived subjects, and subjects without periodic revalidation, never appear there; neither item appears while your organization does not hold Production & Process Control.
Production links
A validation means most where the work happens. Three links carry a subject's status to production: a router operation that names the subject, a change record that names it, and the equipment it was registered with.
In this subsection: Name the subject on a router · Changes that affect a subject · Equipment not in calibration · Starting a special process on the floor · Review floor overrides
Needs: the Production & Process Control module (and NormaMES Traveler for routers and the floor; Calibration for the equipment check).
Name the subject on a router
In NormaMES, on a draft router, open an operation and tick Special process. A Validation subject list appears under it with your process and equipment subjects that are not archived. Choose the one that covers this operation, then Save operation. Software subjects are not offered.
The link is optional. A special process with no subject still releases, and the router says so: "Special process with no validation subject: the floor will not check validation." The operations table shows the subject in the Flags column, or "no validation subject".
The link is part of what you sign when you release the router, so it cannot change on a released router; create a new version to change it. A new version copies each link, except to a subject archived since: that link is dropped, and the router's history says which. Each job copies the link when it is released, and the floor checks the job's own copy, not the router. A job released before its router named the subject (or before this release) is not checked; release a new job on the current router to have it checked.
Typical leads: a quality manager, department manager or inspector (or an administrator) edits draft routers. A quality manager, engineer or department manager (or an administrator) adds validation subjects. Without Production & Process Control there is nothing to choose: the router says once, quietly, "Validation subjects need the Production & Process Control module", and an owner (or an administrator) can add the module from its page in Norma.
On the subject's page, Used by routers lists every router operation that names it, with the router's version and whether it is a draft, released or withdrawn.
Changes that affect a subject
On a change record, Validation subjects affected names the subjects the change touches, for example the oven whose controller is being replaced. Choose the subject, add an optional note, and click Link subject. While the change is a draft or submitted, the subject shows "Change CC-#### pending (not yet approved)" beside its status. That is information only.
Once the change is approved (or authorized as an emergency), the subject's status becomes Invalidated by change CC-####, and stays that way through implementation, verification and closure, until a validation of the subject whose execution started after the change was approved is itself approved. A validation that was already executing when the change was approved does not clear it, even if it is approved afterwards, and neither does a validation that closes failed. Writers of protocols get a work item, "Revalidate … after change CC-####", until then. A rejected, deferred or cancelled change shows nothing.
To take a subject off a change, open End this link and say why. The link is not deleted: the change keeps it, with who ended it, when and why, and both the change's and the subject's histories record it. Links are made and ended while the change is a draft, submitted, approved, implementing or verifying. Once the change has been approved, ending a link clears an invalidation the approval put in place, so only a quality manager (or an administrator), who holds change approval, can end it; anyone else sees who can.
Typical leads: whoever proposes changes (a quality manager, department manager or engineer, or an administrator) links subjects and, before approval, ends links. The subject's page lists, under Changes naming this subject, every change that has named it; a change from a department you cannot see shows its reference only.
Equipment not in calibration
An equipment subject also shows Equipment not in calibration when its equipment is overdue, needs recalibration after maintenance, has never been calibrated, or is not in service (out of service or retired), read on your organization's calendar. The calibration due day itself still counts as in calibration. This check runs while your organization has the Calibration module; without it, the status adds "Equipment calibration not checked: Calibration module not on the plan".
A subject can show more than one cause at once. A subject with a cause is never shown as simply "Validated", and the floor treats it as not currently validated.
Starting a special process on the floor
The check runs once per operation, at its first sign-off: the first signature an operator puts on a special process whose job names a validation subject, whatever it is: Start, but equally First piece, an inspection or Complete on an operation nobody started, or Sent out on an outside special process (which is never started). Norma checks the subject's status at that moment:
- Validated, or Revalidation due (inside the 30 days before the date): the signature goes ahead with no warning.
- Not currently validated (never validated, expired, failed, invalidated by a change, or equipment not in calibration): nothing is signed. The screen says "This special process is not currently validated" and offers the override form under the same button, with a warning that names the subject and its status, for example "Heat treat oven 2 is not currently validated: Expired on 2026-09-30. Starting needs an override."
The override is the floor's usual one: a quality manager or owner chooses their name, enters their own PIN and says why, and the signature goes ahead. If the same signature also needs an override for a missing qualification, the one override answers both and the warning names the subject. If the subject's status changes before you try again (for example its validation is approved), the stale form disappears and the screen says to try again.
That first signature records what the check found: the subject, whether it was validated, the status words at that moment, and the override. If Production & Process Control is not on your plan, or the status could not be read, the signature goes ahead with no warning, and the job's timeline and its printed traveler say "Not verified in Norma" with the reason (when the status could not be read, the subject's page lists it too; without Production the subject's page is not open to you).
Archiving a subject makes it "not currently validated" for good: every released job whose operation names it then needs an override for that operation's first signature. Release new jobs on a router version that names the subject that replaced it.
Review floor overrides
Every operation that went ahead through a validation override is listed on the subject's page under Floor overrides: the job and operation, the signature that carried the check and who made it, who authorized it and why, and the status at the time. It is also a work item, "Review validation override on J-#### op ##", for a quality manager or executive (or an administrator). Write what you checked and what you decided, and click Record review. The person who gave the override cannot review it; a second person does. A review cannot be changed afterwards.
Print the protocol and the report
Print the protocol prints every criterion by stage with how it is judged, and its signatures. Print the executed report (once execution has started) prints every attempt with every reading (its source, and for a stream reading its id), its verdict, every correction with its old and new data, every deviation, and every signature with the signer's name, its meaning and the date and time. On screen a long list of readings stops at 50 and says the printed report lists every one. Each printout opens with a notice that says exactly what it is: a draft, a pre-approved protocol not yet executed, an execution in progress, an approved or failed validation, or one superseded by a later version. Printed pages have 0.75 inch margins, the validation's reference at the top of each page, and at the bottom who printed it and when, the page number, and "Uncontrolled when printed. The controlled record is in NormaQMS." (Your browser draws these where it supports page margins.) The printed page names the time zone its dates and times are in.
On the validation page a Download PDF button sits after Print the protocol and after Print the executed report; on each printed page it sits next to Print / Save as PDF. It downloads the same document as a PDF file, VAL-0001-v1-protocol.pdf or VAL-0001-v1-report.pdf, with everything the printed page shows. Each PDF is Letter size with 0.75 inch margins. Page 1 has a title block: your organization, the document title, the VAL reference and version, the subject, its owner, the stages, the status, and who pre-approved and approved it and when. Every page has a header with your organization, the reference and the document, and a footer with "Page X of Y", who downloaded it and when, and "Uncontrolled when printed. The controlled record is in NormaQMS." A draft, superseded or failed validation is marked DRAFT, SUPERSEDED or FAILED at the top of every page, and the report of a validation still being executed is marked IN PROGRESS. Tables that run onto another page repeat their column headings. Signatures are in a bordered block, each with the signer's printed name and login, its meaning, and the date and time. Dates and times on the printed pages and in the PDFs are in your organization's time zone (Settings), and both say which, for example "Times in America/Chicago." (Norma uses America/New_York until a zone is chosen.) The validation screens use the same zone and say so. Characters the PDF's standard font cannot show, such as Chinese or Japanese text, print as ?; the record in Norma keeps them.
Anyone who can open the printed pages can download the PDFs. The executed report's PDF is offered once execution has started.
Evidence files attached to check results, including files a correction replaced, are included in the evidence archive export, under Production records, filed under the VAL number. A member can download an evidence file even after the organization's plan stops including Production.
Signing in again to sign is not asked for yet; that will come to every signature in Norma at once.
Validate Norma
ISO 13485 4.1.6 asks you to validate the software your quality system runs on, and that includes Norma. Validate Norma sets that up for you as an ordinary validation: a software subject for Norma, and a draft protocol with IQ checks of your installation and OQ scripts for the modules you use. You add the PQ, a second person pre-approves it, and you execute and approve it like any other validation. Norma's own automated test results for the release are shown beside it as supplier evidence. They are not your OQ.
In this section: Start it · What it generates · Write the PQ · Supplier testing · New releases · When it is turned off
Open: More > Production & Process Control, then Validation, then Validate Norma below the register. Typical leads: a quality manager, engineer or department manager (or an administrator) starts it and writes the PQ; a quality manager or executive (or an administrator) pre-approves it, approves it and assesses new releases. Needs: the Production & Process Control module.
Start the Norma validation
Choose Validate Norma. Norma adds a software subject called Norma, owned by you, at the release you are running, and opens its draft validation (VAL-####, version 1). Your organization has one Norma subject; once it exists, the card links to it instead.
What the protocol holds
IQ (installation), six checks you work through and sign off with a note or a file:
- Release identity. Help > This release shows the version, build and schema, and they match the supplier evidence for that release.
- Users and roles. Settings > Organization > Members matches your approved list of users and roles. Attach the list marked against Members.
- Sign-in and the second step. Everyone signs in with their email and password, or an emailed sign-in link, and anyone who has set up an authenticator app also enters its code. Administrators confirm a code from an authenticator app before an administrator action; before their app is set up they confirm one emailed code and are then asked to set it up (chapter 2). Members who are not administrators, and consultants or auditors working under a grant, are not required to use one.
- Retention and backup. Norma's database is hosted by Supabase on the Pro plan. Supabase takes a daily backup and keeps each backup for 7 days. Point-in-time recovery is not enabled. The record chain cannot be changed or deleted, and Settings > Termination pack downloads your registers, files and chains to keep. Note how this meets your retention requirements.
- Electronic signatures. Every validation signature shows the signer's printed name, the date and time, and its meaning. Norma does not yet ask the signer to re-enter a password to sign a validation; note how your procedures cover that.
- Modules in use. The modules your organization had when the protocol was generated. Confirm they match how you use Norma.
OQ (operation), scripted checks for the platform and for every module and product you use: two or three each, written with the screens' own words. Each one is a numbered instruction and the result you should see, and each needs a screenshot. They follow the module's controlled workflow: create the record, route it, have the second person decide, and see the result.
Everything in the draft can be edited, moved or removed before pre-approval, like any other draft.
Write the PQ
Norma writes no PQ. The draft asks you to Add the intended-use scenarios your shop relies on (PQ): for example, releasing a work instruction the way your procedure says, or closing a nonconformance with its disposition. Add them as criteria with the stage PQ. Pre-approval is refused until there is at least one.
Supplier testing
Below the protocol, and in both printouts, is Supplier testing (Norma's automated suite). It is read-only. For the release your validation covers, it shows the commit Norma tested and the commit it released, and the requirement tables of the platform and the modules you use: each requirement, the test files that verify it, and the passed, failed and skipped counts in those files. If some results were carried forward from an earlier run, it says which. On screen each table is folded; the printout shows every row.
A small patch release can carry partial evidence: Norma re-ran the test files that reach the code it changed, plus a fixed set of structural checks, and carried the other results forward from the runs behind the last full release (none of them more than seven days old when the patch was released). The section says how many test files were re-run and why, where the rest comes from and when the oldest of it ran, marks each requirement as run or carried forward, lists any changed code no test reaches, and lists changed documentation, which is not executed. A change to anything else (data, settings, the database) always gets the full suite.
Supplier testing is not your OQ. It shows what Norma's automated suite verified at that release. Your IQ, OQ and PQ are your evidence.
New releases
Every time Norma is deployed it is a new numbered release, with its own release notice and supplier evidence. Most releases do not touch the modules you use; the Norma subject lists those as "v1.0.3: no requirement changes in your modules" and nothing else happens.
When a release changes a requirement of a module you use, or of the platform, or is marked for re-execution, the Norma subject shows New release — assess and says which of those it is, and the release appears in the work queue (Assess Norma release) of everyone who holds validation approval. On the subject page you decide:
- Assess: write why these changes need no revalidation in your shop (up to 2,000 characters), and choose Assess and sign. The signature reads "Assessed release v1.0.3: no revalidation required". Someone who entered a result, a correction or a deviation in the latest approved Norma validation cannot assess; a second person must.
- Start a new version: give the reason, and Norma generates a new draft with IQ and OQ for the release you are running and the modules you use now, and copies your PQ. Validate it as before.
If the latest Norma validation failed, no release is assessed against the older approval: the subject asks you to start a new version instead.
When Validate Norma is turned off
Norma generates and assesses only on a recorded release. If the build you are using is not one, the card says so, for example "This deployment (commit abc1234) is not a recorded release", and the buttons stay off. Nobody in your organization can change this: Norma records each release as it deploys it. If it stays, contact support@normaqms.com.
In the user guide
This article is chapter 19, "Production and Process Control", of the NormaQMS User Guide (NORMA-UG-001), which is under Help > User guide. Chapter numbers in the text refer to that guide.