Modules · For the quality manager
Equipment and calibration
How the work moves
Measurement equipment- 1Register
- 2Schedule
- 3Calibrate
- 4Evaluate out-of-tolerance impact
Open: Equipment > Equipment & Calibration. Typical leads: Quality Manager and QA Technician; department managers can maintain permitted equipment records.
Register equipment
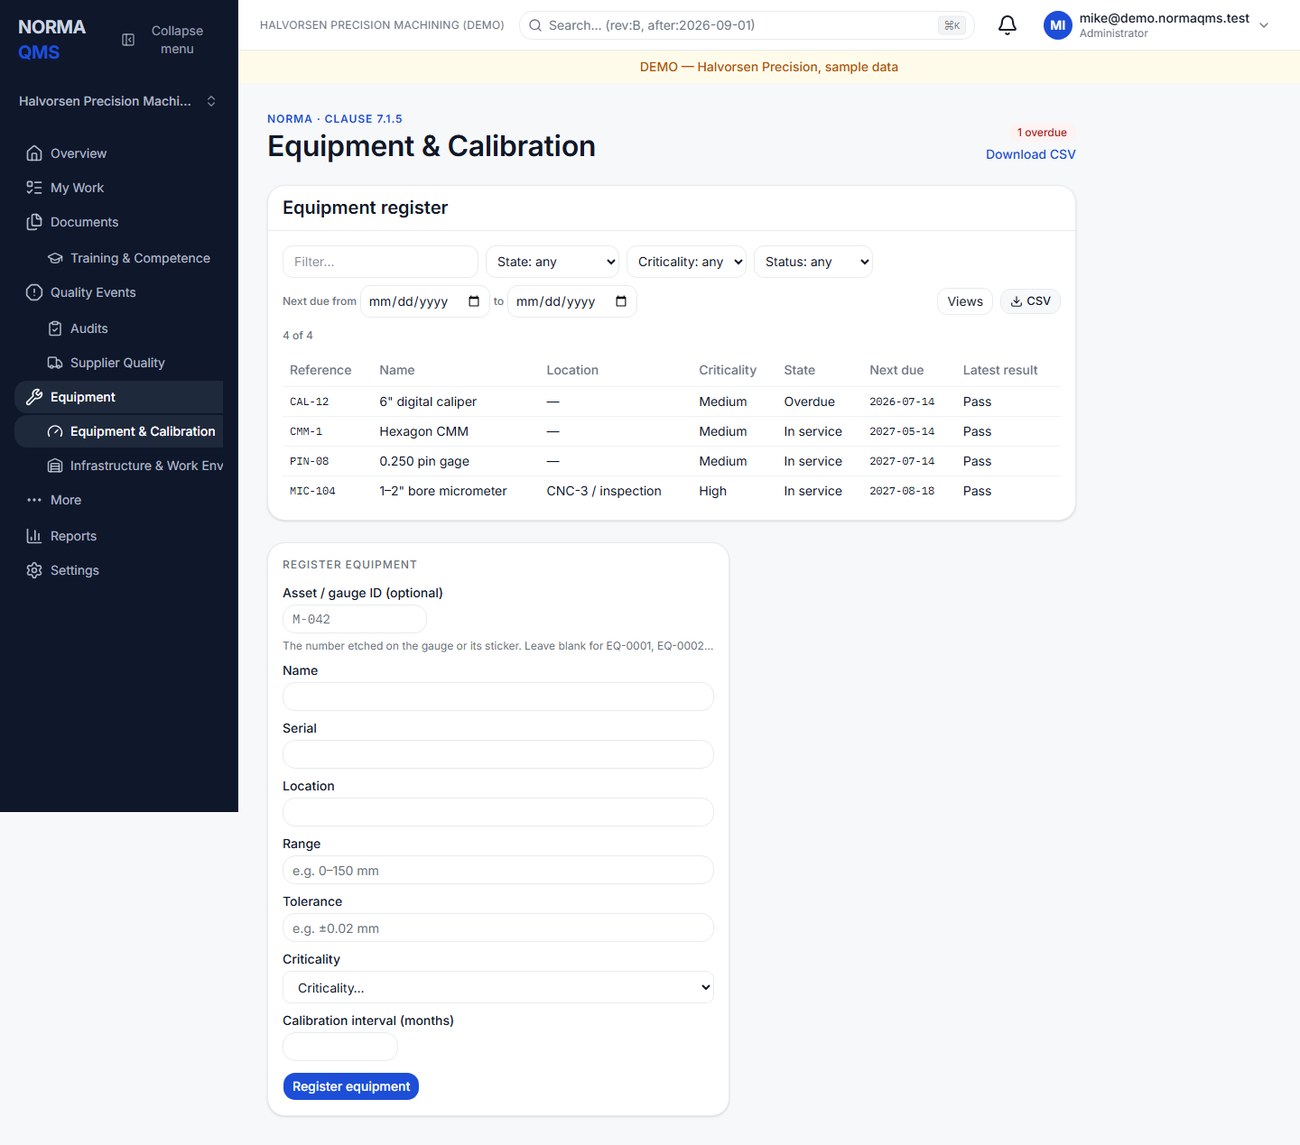
- Enter an optional existing Asset / gauge ID, or leave it blank for an assigned reference.
- Enter name, serial number, location, measurement range, tolerance, and criticality: High, Medium, or Low.
- Enter a positive whole-number calibration interval in months.
- Choose Register equipment and confirm the identity. Avoid using a model number where a unique asset ID is needed.
The register derives due state from the latest qualifying calibration and interval. Its State column shows In service, Never calibrated, Overdue, Out of service, or Retired; on the equipment record the same pill reads Due rather than Never calibrated. Due state is different from equipment service status, and an out-of-service gauge past its date still reads Overdue. An instrument sent away may need to be marked out of service even if its date has not yet expired.
Record a calibration
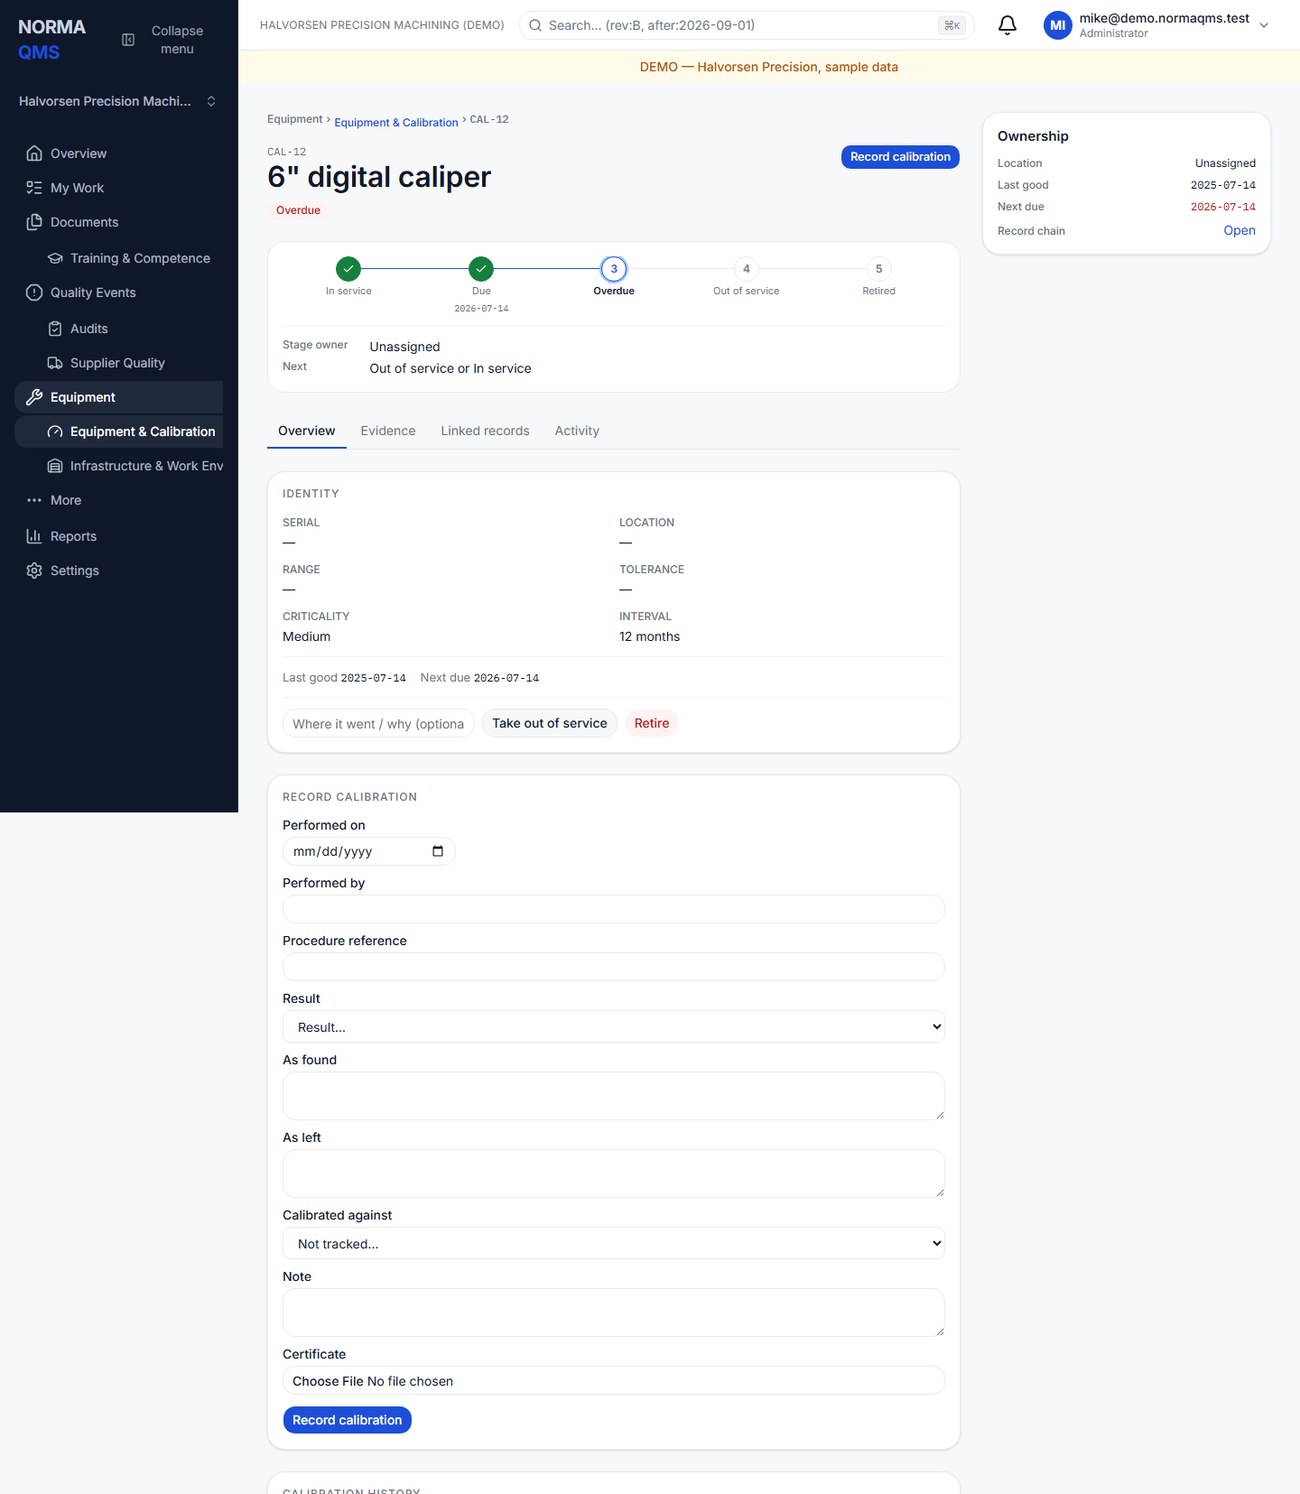
- Open the equipment record and the calibration form.
- Enter Performed on, Performed by, procedure reference, and result: Pass, Limited, or Fail.
- Enter as-found and as-left information, plus notes describing adjustments, limitations, or relevant evidence.
- Select Calibrated against if another equipment record in this organization was the reference standard. Do not select the instrument itself.
- Attach the certificate during recording, observing the 25 MB limit.
- Choose Record calibration. Verify the event, certificate, hash, and resulting last-good and next-due dates.
Pass and Limited can advance the calibration clock. Fail does not advance it. A later failed event must therefore be considered even if the register still has a historical last-good date. Do not interpret a date by itself as permission to use a failed instrument.
Caution: A Fail with the instrument still in service is the combination auditors find. Record the failed event, then Take out of service in the same sitting, then open the out-of-tolerance assessment. On the Traveler tablet a gage that is overdue for calibration is refused at the inspection unless a quality manager overrides it with a reason, so the floor will feel this immediately.
Control service status
Use Take out of service when the instrument must not be used, adding where it went or why. Use Return to service when the authorized process supports returning it. Use Retire for equipment permanently removed from use. Retired equipment cannot simply be returned through the normal status control, and its evidence remains on record.
Assess out of tolerance conditions
- Open an out-of-tolerance assessment from the relevant calibration event where offered, entering the Use period — the span since the last known-good calibration.
- Identify work accepted using the instrument in that period. Use job, lot, product, and inspection references.
- Write the Impact summary and choose the Decision: No impact, Impact contained, or Customer action required.
- Raise a CAPA from the assessment if systemic corrective action is required. One CAPA can be raised from a given OOT assessment.
- Choose Close assessment. Retain the connection to the calibration event.
An OOT assessment does not automatically quarantine stock, issue a recall, or decide every affected product's acceptability. Record those operational decisions in the relevant modules and your shop process.
Completion check: actual instrument status, result, restrictions, next due date, certificate, and affected-product assessment agree. Certificate downloads remain available to eligible members even if the calibration subscription later lapses; that does not imply all paid-module functions remain available.
Measurement system analysis (gauge R&R)
A measurement system analysis (MSA) answers one question: is this gauge, used by these people, good enough to tell good parts from bad ones? The common form for variable gauges is the gauge repeatability and reproducibility study (gauge R&R). It separates the variation in your readings into what the parts really differ by, what one person gets when they measure the same part again, and what changes from person to person. For pass/fail checks there is an attribute version that compares each person's calls against each other and against the known answer.
In this section: Start a study · Run the blinded sheet · Paste a paper study · Read the verdict · Correct a reading · Approve a study · Raise a nonconformance · See affected travelers · "Consider a new MSA" · The free calculator
Open: Equipment > Equipment & Calibration, then the gauge record, or the MSA studies link on the equipment register for all studies. Typical leads: Quality Manager for setup and approval; QA Technicians and operators enter readings.
Start a study from a gauge
- Open the gauge record. The Measurement system analysis panel shows the gauge's latest study, or says No MSA on record for this gauge and offers a first study.
- Choose to start a study. You land on New MSA study with the gauge already chosen. A rail across the top shows the whole study: Set up, Collect readings, Analyze, Approve. Setup takes four steps, and a panel beside each step explains it. Nothing is recorded until you press Create study on the last step.
- Gauge and check. Confirm the gauge, then say what it tells you: A measured value (calipers, micrometer, bore gauge, CMM; a variable gage R&R) or A pass/fail call (go/no-go plug, thread gauge, visual standard; an attribute agreement study).
- What you measure. Enter the Feature being checked, the part number, and the nominal, limits and unit if the drawing gives them. Limits are optional.
- People and parts. Enter how many parts, how many times each person checks each part, and who will check them, one name per line. Variable studies take 2 to 30 parts; attribute studies take 10 to 100. Both take 2 to 5 people and 2 to 5 checks per part. The usual study is 10 parts, 3 people, 3 times each (50 parts for an attribute study). The step shows the total number of readings the study will take. For an attribute study, also set the right answer for each part with its Accept or Reject button. Mark the open ones accept fills every part you haven't set, so you only have to mark the bad ones. The study needs at least one good part and one bad part.
- Review and create. Check the summary; Change takes you back to any step. For a variable study, choose what the gauge is judged against: Your tolerance (is it good enough to accept and reject parts to this spec? This needs both limits) or The parts in the study (can it tell your parts apart?). Advanced statistics holds the historical process sigma (optional) and the Interaction pooling level (alpha). The study checks whether some operators measure some parts differently from others (an interaction), and folds that effect into repeatability only when it is not significant at this level. 0.05 matches the AIAG manual's worked example and is the default; 0.25 pools only when the effect is clearly negligible, which lowers the risk of missing a real interaction. Leave both alone unless your customer or consultant asked for something specific.
- Press Create study. If a step has a problem, the wizard names it and stays on that step. The study is numbered MSA-#### and starts as a draft.
Choose parts that span the range the gauge really sees. A study run on ten nearly identical parts will flag itself with a narrow-spread warning, because it cannot say much about the gauge.
Run the blinded run sheet
- On the study, under Collect the readings, choose Generate blinded run sheet.
- Print it with Print run sheet. Each operator gets their own order for each trial. The order is randomized once, from a stored seed, when the sheet is generated. You can reprint the sheet at any time and it comes out the same.
- The sheet shows a blind code for each part, not the part's identity or earlier readings. Operators write one reading per row.
- Whoever prepares the parts prints the Part label key. It maps each blind code to the real part number. Label the parts with the codes. Keep the key with the person preparing parts, and do not give it to the operators; that is what keeps them blind.
- Enter the readings as they come in. When the last reading lands, the study analyzes itself.
Tip: If a part has to be replaced mid-study, stop and start a new study. Do not relabel.
Paste in a study you already ran
If the study was done on paper or in a spreadsheet, you do not need to generate a sheet.
- On the study, choose Paste in a study already run.
- Paste into Readings, or upload a CSV or text file.
- Use either layout. Long: one reading per row (part, operator, trial, reading). Wide: one part per row, with a column per operator and trial, for example
Part, A1, A2, B1, B2. - Choose Import readings.
If a row does not parse, Norma names the line number and stops before importing anything. Fix the line and paste again. A row with more cells than the header is refused too: in a comma-separated paste, a decimal comma (10,02) splits one number into two cells, so use a decimal point. The person who imports the readings is recorded, and they cannot approve the study.
Read the verdict
When the readings are complete, the Result section shows the analysis. Norma follows the AIAG guidance for the verdict.
Variable studies. The main number is %GRR, the share of variation that belongs to the gauge and the people using it.
- Under 10%: acceptable.
- 10% to 30%: marginal.
- Over 30%: unacceptable.
- The number of distinct categories should be 5 or more.
Attribute studies. The verdict looks at how often appraisers agree with the reference and with each other (effectiveness of 90% or better is acceptable, 80% or better marginal), the miss and false-alarm rates, and the kappa agreement scores.
Warnings appear beside the result when the data has a problem, for example out-of-control ranges or too little spread between parts.
Caution: The verdict is guidance. A marginal gauge can be the right choice for a low-risk feature or an expensive measurement, and an acceptable one can still be wrong for a critical characteristic. The approver decides, and a marginal result cannot be approved without a written justification.
Correct a reading
A wrong reading is corrected, not overwritten.
- Under Corrections, choose Correct a reading and pick the reading.
- Enter the new value and a reason. The reason is required.
- Choose Correct. Norma re-analyzes the study and stores a new result.
The old result and the old reading stay in History under Earlier results, with who changed what and why. Only the newest result can be approved. An earlier result's report is stamped NOT CURRENT with the date of the analysis that superseded it, and so is the newest report while a corrected study waits in collection. Whoever corrects a reading is recorded and cannot approve the study.
Approve a study
- Open a study whose status is analyzed.
- Read the result, the warnings and the report.
- Enter a justification (required when the result is marginal, optional otherwise).
- Choose Approve MSA-#### (the button carries the study's number). Approving signs the result as the gauge's measurement system record.
After approval the study and its readings cannot be changed. A study has at most one approved result.
Who can approve. Approval needs the calibration approval permission, held by Quality Managers and executives, and by administrators. It also needs a second person: anyone who entered, imported or corrected a reading in the study cannot approve it, even if they hold the permission. Norma enforces this in the app and again in the database. If you are that person, the page names who can approve instead. This is the same independence rule an auditor expects from any review of your own work.
Print or save the report with Print / Save as PDF, or download the readings with Download readings (CSV). The report carries the engine version, the input fingerprint, the method settings (study variation multiplier, interaction pooling rule and any historical sigma), the randomized run order, who entered the data, who approved, and the gauge's calibration due date as it stood at the time of the study. Its appendix lists every reading by part, operator and trial (for attribute studies, every call and each part's reference decision); a corrected reading is marked with an asterisk, and a footnote gives the old and new value, the reason, who corrected it and when. A report that is no longer the study's current result carries a NOT CURRENT banner at the top and in the footer.
Raise a nonconformance
When an approved study is unacceptable, the gauge has been giving readings you cannot trust.
- Open the approved study. The Nonconformance section shows either the linked NCR or No nonconformance has been raised from this study.
- Choose Raise NCR. The form is prefilled from the study: the requirement, the actual condition and the detection point.
- Review and submit.
One NCR can be raised from a study, and it links back to the result. Work the NCR as usual, including a CAPA if the cause is systemic.
See which travelers used the gauge
If your organization has Traveler, an approved unacceptable study lists the traveler operations that used this gauge since its last acceptable study. Find the list on the gauge's Measurement system analysis panel.
Use it to decide what to look at again. The list shows the 500 most recent sign-offs; a plus sign after the count means more exist. If the gauge has no traveler use in that window, the list says None.
The "Consider a new MSA" prompt
The gauge's Measurement system analysis panel shows Consider a new MSA when something has happened that could have changed the gauge's capability: a failed or limited calibration, an adjustment, or maintenance since its last study. The prompt names the reason. It is a nudge, not a lock. Start a new study from the panel when the reason matters for the characteristic you measure. A new approved study supersedes the earlier one, and the earlier one stays on record.
The free calculator
Norma has a free gauge R&R calculator at /tools/gage-rr that anyone can use without an account. Paste readings and it produces the same analysis. It runs entirely in your browser: nothing you paste is sent to Norma. Your paste is kept in that browser only, so you can come back to it; choose Clear to remove it, especially on a shared computer. The report it prints is marked not a controlled record, because there is no gauge, no approval and no signature behind it. Use it for a quick look. For a study that has to stand up in an audit, use a study in Norma, with the run sheet, the independence rule and the approval.
In the user guide
This article is chapter 15, "Equipment and Calibration", of the NormaQMS User Guide (NORMA-UG-001), which is under Help > User guide. Chapter numbers in the text refer to that guide.